I just found out that I have been selected to be a stamp reviewer for Rubber Stamping Fun! They're a relatively new stamp company that I'm excited to see growing.
I don't have a lot more details yet, but as soon as I do, I will let you know. I believe sometime next month I'll receive my first set of stamps to review, then you'll benefit from seeing some new designs.
FYI -- I'm not selling the stamps and I don't receive any sort of commission through this program. I just make cards/projects with what they send me and post everything here on this blog.
I can hardly wait!
Wednesday, May 9, 2007
$$$
So this isn't really stamping related, but it was fun anyway!
I just found this cool button. Is my blog REALLY worth that?? :) I don't know, but it was fun.
If you have a blog, click on the link and enter your URL to find out how much it's worth!

My blog is worth $5,645.40.
How much is your blog worth?
![]()
If you have a blog, click on the link and enter your URL to find out how much it's worth!
Tuesday, May 8, 2007
Graduation
Myhusband's second cousin is graduating next week, so I created two cards. This is the "congrats" card. I used a piece from his actual announcement for the main image. It is a vellum piece which reads "class of 07." I used my 2way glue pen to outline those words and then added Dazzling Diamonds (yes, I'm still the glitter queen!). . . . I embossed "Congratulations" in silver detail EP and cut the front flap shorter for it to show through. I mounted the vellum piece onto Real Red with Vintage brads and adhered it to the Basic Black card. Inside, I used the silver side of my Zig Painty to write a message.
I created this Real Red Petal Card to hold his gift card.
 Outside, I used the "faux metal" technique from SU regionals to create the "Good Luck" tag. For the last step, I "dry stamped" my stamp in Dazzling Diamonds, then into the warm silver to create that look. I then used my tab punch to create the edges of the tag, and punched holes with the 1/16" punch and ran silver cording through it, tied in back.
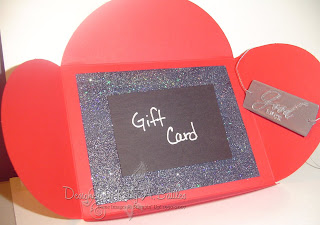 Inside, I ran Ballet Blue craft ink all over a piece of Basic Black. Then I added Hologram Highlights EP and embossed it. I will adhere his actual gift card to that piece.
 This is the "congrats" card. I used a piece from his actual announcement for the main image. It is a vellum piece which reads "class of 07." I used my 2way glue pen to outline those words and then added Dazzling Diamonds (yes, I'm still the glitter queen!). . . . I embossed "Congratulations" in silver detail EP and cut the front flap shorter for it to show through. I mounted the vellum piece onto Real Red with Vintage brads and adhered it to the Basic Black card. Inside, I used the silver side of my Zig Painty to write a message.
I created this Real Red Petal Card to hold his gift card.
 Outside, I used the "faux metal" technique from SU regionals to create the "Good Luck" tag. For the last step, I "dry stamped" my stamp in Dazzling Diamonds, then into the warm silver to create that look. I then used my tab punch to create the edges of the tag, and punched holes with the 1/16" punch and ran silver cording through it, tied in back.
 Inside, I ran Ballet Blue craft ink all over a piece of Basic Black. Then I added Hologram Highlights EP and embossed it. I will adhere his actual gift card to that piece.
Monday, May 7, 2007
Happy Mother's Day! (a little early)
 I can finally post these pictures because the mothers have received their cards. Both cards used a *new* set from Stampin' Up that will be in the *new* catalog coming out this July! (I received it at the VA Beach Regionals last month.)
 SUPPLIES: Confetti White, Old Olive, So Saffron cardstock; Designer Series paper; watercolor paper; giga scallop oval & 1/16" punches; Double Line Doodles & Whimsical Alpha sets; So Saffron & Old Olive ink; aqua painter; Rich Regals Watercolor Wonder Crayons; 2way glue & dazzling diamonds glitter; stampin' dimensionals; narrow celery organdy ribbon.
Sunday, May 6, 2007
Organized the corner . . . .
 I have completed my organizing. From the "before" picture, it's not that drastic of a change, but trust me. . . it took almost 2 hours to organize, sort & put (or throw) away everything that had accumulated under that table! I also spent a good amount of time going through my stamp sets that are retiring (boo hoo).
P.S. For those of you who click on the image to enlarge, I know the floor is dirty -- that's tomorrow's project! : )
Cuttlebugging again
I'm either going to be known as the "glitter queen" or the "cuttlebug queen." I can't decide. Although most people who see me in person would say "glitter queen" for obvious reasons! :)
After organizing my space, I have found it to be VERY easy and VERY quick to make cards now! I made this card in all of 5 minutes or less. DETAILS:
Naturals white, chocolate chip, bashful blue & close to cocoa cardstock; chocolate chip classic & craft white ink; white narrow organdy ribbon; cuttlebug embossing folder & die cuts (ribbon sliders); natural beauty& everyday flexible phrases stamp set.
I also created this clock for my stamping area! I used a 3.99 clock from IKEA (have I mentioned that IKEA is my fave store?? hee. . . hee. . . ), SU deco paper, & the flower punch! That's it! he actual designing and assembling took 5-10 min.
After organizing my space, I have found it to be VERY easy and VERY quick to make cards now! I made this card in all of 5 minutes or less.
 DETAILS:
Naturals white, chocolate chip, bashful blue & close to cocoa cardstock; chocolate chip classic & craft white ink; white narrow organdy ribbon; cuttlebug embossing folder & die cuts (ribbon sliders); natural beauty& everyday flexible phrases stamp set.
I also created this clock for my stamping area! I used a 3.99 clock from IKEA (have I mentioned that IKEA is my fave store?? hee. . . hee. . . ), SU deco paper, & the flower punch! That's it! he actual designing and assembling took 5-10 min.

Subscribe to:
Comments (Atom)


